Slide

Wednesday, February 15, 2017

Recipe // Biscuits And Gravy

Guys, it's been two weeks since I've posted. *gasps*  I'm still figuring out what posting schedule I want to stick with- but I think once every two weeks is a little too far apart. What do you think about every Wednesday?

Anyways, I'm finally posting and for this special occasion (no, not really. It just feels special because it's been so long since I've posted!) I'm giving y'all a classic comfort food --- biscuits n' gravy! I made these for Sunday dinner last week and they were the perfect Sunday afternoon dish. Breakfast for dinner anyone?

Let's start with the biscuit recipe...
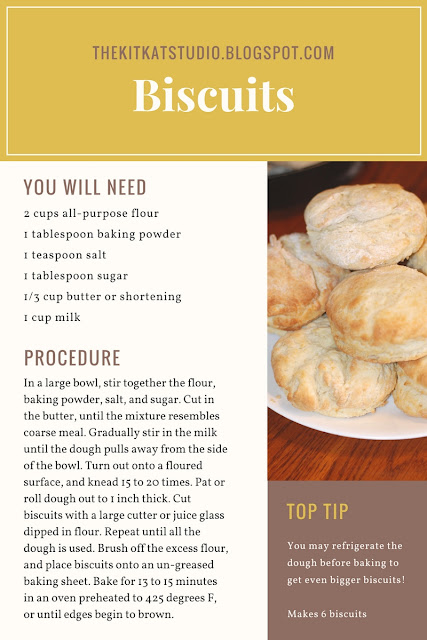
~ Biscuits ~

Ingredients:                  Makes 6 biscuits
  • 2 cups all-purpose flour
  • 1 tablespoon baking powder
  • 1 teaspoon salt
  • 1 tablespoon sugar
  • 1/3 cup butter or shortening  
  • 1 cup milk

In a large bowl, stir together the flour, baking powder,
salt, and sugar.

Cut in the butter, until the mixture resembles coarse meal. 


Gradually stir in the milk until the dough pulls away from the side of the bowl.
Turn out onto a floured surface, and knead 15 to 20 times.
Pat or roll dough out to 1 inch thick. 
Cut biscuits with a large cutter or juice glass dipped in flour.
Repeat until all the dough is used.
Brush off the excess flour, and place biscuits onto an ungreased baking sheet.
Bake for 13 to 15 minutes in an oven preheated to 425 degrees F, or until edges begin to brown.

Recipe Card
Download PDF

Now for the gravy... :)
- - - - - - - -


~ Gravy ~

Ingredients:
  • 1 pound sausage
  • 1/4 cup flour 
  • 2 cups milk
  • salt and black pepper to taste


Crumble and cook the sausage in a large skillet over medium heat until browned.
Stir in flour until dissolved.
Gradually stir in milk.
Cook gravy until thick and bubbly. Season with salt and pepper.
Serve over hot biscuits. Refrigerate leftover gravy.

- - - - -

What is your favorite food to have for breakfast?
I don't like sweet breakfasts because I usually end up felling sick the whole morning.. ;) I'd take biscuits and gravy over donuts for breakfast any day!

Wednesday, February 1, 2017

DIY Colored Cork Board

When I walk into Hobby Lobby, my common sense sometimes stays at the door and I often end up walking out with things I wasn't planning to buy, or don't even like! Take these cork boards for instance, I don't know why I bought them. But they came home with me one day- and have stayed in my desk drawer ever since. Last week, while cleaning out my drawer, I discovered them and decided I should find a use for them, and of course painting them with acrylic paint is the obvious solution, right?! Well, obvious or not that's what I decided to do to these cork boards and they couldn't have turned out better! I LOVE the color they bring to my wall and I honestly didn't want to cover them up when it came time to hang things on it! I did end up adding a few things, just to complement it. ;)
This tutorial is really pretty simple- but I'll go ahead and show you how I decorated my cork boards to hopefully inspire you for you own design! Feel free to replicate mine if you like. I'm decorating four small pieces of cork, but you can do the same thing with one large piece, or whatever collection you have! :)

~ DIY Colored Cork Boards ~

Supplies:
  • Cork board
  • Acrylic paint (Have you noticed I use this stuff a lot?! :D)
  • Foam/sponge brush
  • Masking tape
 I'm using two different colors of acrylic paint, you can use as many as you want! Or you could just use one color- it's totally up to you!
I started off, by painting the first square blue.
You'll want to put a piece of scratch paper, or a paper towel down underneath the cork board so you don't get any paint on your work area.
(It's really pretty self explanatory- just brush on the paint!)
Then I did the same thing with the pink paint on the second square.
For the third and fourth squares, I painted half of the square blue, (It won't matter if you're exact or not for the first color [blue for me], you'll be able to cover up the messy edge with the second color [pink].)
Allow the paint to dry completely.
 Now is where you want to get exact. Using a piece of masking tape will help a ton! Just mask off one half of the square and you won't have to worry about having a messy edge.
Now you can apply the second color of paint.
 Do this with both squares. Allow to dry completely before removing the tape.
When the paint has dried, remove the tape!
Ta-da!! Now they're all done and just need to be arranged.
I used foam tape to hang them on my wall. Then they were ready for me to hang my knickknacks on!
Other projects in picture: DIY Dry Erase Board
I love how they look next to my desk! I just painted my room (it used to be green!), so this is the first thing I've hung on my wall yet, and I love the color it brings to my room. :)

- - - - -
 Do you have a cork board? What kind of things do you hang on it?
 ♥Katie

Related Posts Plugin for WordPress, Blogger...